Swiss Interface Syndrome.

April 12, 2008 on 1:53 pm | In Apple, Interface Design, Popular, Ramblings, Typography

I have been noticing a disturbing trend in custom interface design of third party applications for Mac OS X. As it is no longer an exception for software developers to build interface elements that are entirely unique to their application, the threshold for customizing other, system-standard interface elements is also lowered significantly. The ghastly trend I am about to describe is in existence due to this lowered threshold. In fact, I think this particular deviation off the beaten interface path would have been far more frowned upon a few years ago, when Mac interface designers were more conservative in using custom UI elements in general, and Apple disapproved of it more fiercely. Today, however, it won’t even stand in the way of scoring a design award runner-up, as my examples will go to prove.

Continue reading Swiss Interface Syndrome….

New freeware iconset release: Orion.

November 21, 2007 on 11:26 pm | In Announcement, Design, Graphics, Icon Design, News, Personal Work, Popular

( Go to icon set directly)

For the last month, I have been working on a freeware icon set to supersede all my older work. I was interested in how much I could learn by attracting critique from the most valued artists and criticasters I have in my buddy lists and address book, and I took it all to the heart. I decided to make a folder set that would find the middle ground between the flat front-on perspective of Mac OS X Leopard and the old, spatial perspective of folders in Tiger.

Continue reading New freeware iconset release: Orion….

Leopard System Preferences icon.

July 27, 2007 on 8:49 pm | In Design, Graphics, Icon Design, Personal Work, Popular

So, apparently the latest seed of Leopard has a revamped System Preferences icon. Don’t go requesting the ADC members to upload it, that would be wrong. I have gone through the hassle of making a new icon based on the design. A little present, if you will!

sysprefspreview.jpg

Download it here.

Edit: TUAW hit :). Hello visitors, don’t forget to check out the other freeware icons for OS X at Icon Designer. Also, if you are interested in icons for use in Leopard applications, I have released a Leopard-ready stock icon set at the Icon Store.

Leopard ‘Universe’ wallpaper.

June 11, 2007 on 10:07 pm | In Apple, Design, Graphics, Popular

Just a treat. Enjoy this Leopard wallpaper as a gift from Icon Designer ;).

leopreview.jpg

Thanks for the downloads! This image has seen about 6000 downloads since it’s inception two days ago, and I’ll make a version without the ‘mess’ behind it for release soon.

Ah, what the hell.

May 4, 2007 on 8:55 pm | In Personal Work, Popular, Timezones

I thought, go download your own and see if it works out for you. I got mail from Nano users willing to test too, so hey.

The beta of Cocoia Timezones is now public. Be sure to read the readme and follow installer instructions. It allows you to choose a different directory to install to (recommended).

release.jpg

Features excluded in this BETA version:

  • Personalised timezone overlay,
  • New 1.0 themes,
  • Map smooth motion.
  • This is not feature complete. Please test this for me, and give me feedback about bugs, inconsistencies, and suggestions at this address.

    Download now.

    Review: Security in OS X Leopard Preview Build

    March 25, 2007 on 7:04 pm | In Apple, Popular, Security

    I’ve got a few friends who really develop Apple software for a living (whose names I’d rather not discuss here) and run Apple’s developer builds of Leopard for software testing purposes. Every once in a while, I come by and test some of my apps, and the last few weeks, whenever I had some time to spare, I’ve been around the network to check on the security of the latest build - Client and Server edition. Stability and release date aside, Leopard’s already a very special OS. Apple’s taken a bit of a fright from the last ‘MOAB’ (The Month of Apple Bugs, for the uninformed) and has locked down several portions of the OS. The highlight of my tour was when someone said:

    “Hey, Sebastiaan, don’t you, you know… -like- this stuff?” *Points at monitor*
    Me: *peeks over and faints*

    Here’s what I saw;

    Image removed to comply to DMCA notice.

    This is the Server Admin management pane for Leopard (people have pointed out this looks the same in Tiger, well, it now does what the GUI says it should do, touchĂ©), and although it sucks big-time that there is, once again, a built-in ‘don’t fuck up’ (some fields cannot be edited, including the ICMP rules), but look at that! It’s a veritable dashboard for network geeks! Count with that, that Leopard server could sit at home, between your modem, and your airport (slash access point that isn’t Apple), and serve anything (VPN, net-boot, files, calendar, weblogs, streaming, RADIUS to secure your wireless, Printing, software update deployment and even more), serve as a NAT and Firewall that is ultimately configurable. Gee, with all the news of late, I wonder more and more how possible it would be to run this on an Apple TV, or a Mac Mini. The latter must be possible, but the first would be fantastic. I have seen it running on a 0.7Ghz G4, and it was spanking fast.

    Now, what runs on these Leopard machines, and is it secure?
    Well, to be short: yes. Apple’s done a lot to make the Darwin 9 and up family save on a network administrator’s sleepless nights.

    First of all, one of my points of critique in my last security articles was that the Firewall preferences were virtually hidden, and disabled by default. Now, following the ‘everything works out of the box - idiot proof - EXTREMELY friendly citizen in networks’, the software firewall is still defaulted to ‘Allow all connections’, but has more fine-grained controls if the user desires, including a, well, lock-down (disallow all traffic). It’s also housed in the Security preference panel.

    Now, since the firewall is hardly the biggest issue in securityland, let’s look at some of the services’ version numbers;

    versioning information removed to comply to DMCA notice

    This looks like a new lineup of software. Especially the FreeRADIUS bundling makes me happy, as it’s becoming an easier technology than ACL’s on Access Points themselves, or even WPA2 / other ‘pass-phrase’ solutions. It’s fine-grained, gives the end-administrator more control over what is happening.

    Other ‘little details’ involve the way the firewall handles things. Apple removed controls I discussed in the Advanced panel of the firewall of Tiger; “Stealth Mode” is gone, “UDP Filtering”, the rather generic button, is gone. You now have the ability to restrict services to the local network, or allow internet access. To my surprise, performing a port scan with nmap yielded all ports filtered but Bonjour. This means, as it stands now, out of the box, Leopard is actually OS-fingerprint proof.

    It has been in the news lately that InputManagers no longer work in Leopard. If anyone was wondering if the loss of InputManagers would really cost Apple’s OS X it’s bleeding edge in user customization and hacking, Apple has done some Input hacking of their own - All Cocoa apps now enjoy inline grammar checking, which must be a service able to vacuum in the data you type. After seeing what service is responsible (this is a joke with Leopard’s new tools), it appears that simply hacking features into the Cocoa functionality will be a lot harder. Apple has hardcoded the spelling and grammar checker into the Cocoa framework itself, ensuring removing the InputManager support won’t break their own features. But is it really that impervious to adding a few hacks? We already know the current builds don’t allow Unsanity apps to do their work, and stuff like Mega-Zoom (a SIMBL plugin) doesn’t work anymore, so yes, it is. Is this really bad news? No. I consider it very good news that runtime code injection isn’t a possibility now. Of course, people will probably start an open, shared framework to put these kind of services in (like skinning, and changing some of the application’s fundamental workings) but Apple’s own binaries… I think we’ll be seeing a fight with that. Apple has proven to be very unforgiving to people reverse-engineering app files that belong to the Dock, or Finder. They discourage the OSX86 project, for understandable reasons. This could, quite certainly, hinder OS X86 hackers and break future exploits.

    This already tells us one thing; Leopard will need less hardening out of the box. As I haven’t tested things like Bluetooth (not really available on the hardware I was assigned) I haven’t got a complete image on Leopard’s security, but it does feature some incredibly strong design decisions to harden the OS in advance. Apple isn’t stupid, they know OS X is the base to their user’s experience, and a secure base will ensure Apple stays in line as one of the most secure operating systems running on computers today.

    iSight Expert. It kicks ass.

    March 18, 2007 on 10:09 pm | In Announcement, Popular, iSight Expert

    isightexpert.jpg

    digg this!

    It’s a mobile world, and your Macbook goes just about anywhere. Sometimes, you just leave it on the desk at your workplace, or at home. Sometimes, you leave it on. Sometimes you don’t. There is always some chance that your attention isn’t on your portable. Theft could easily occur.

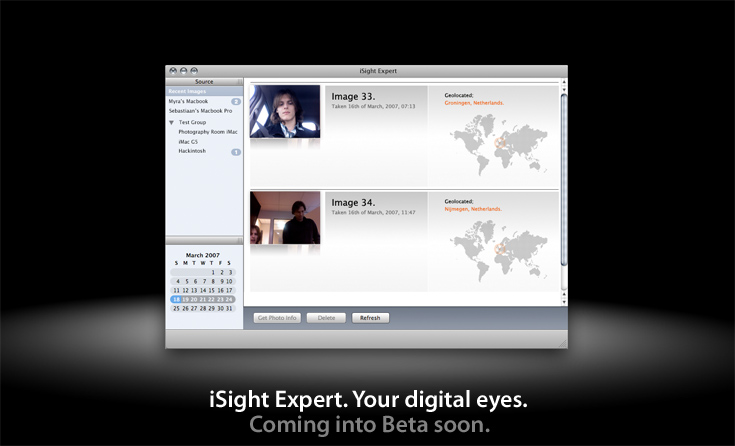
    iSight Expert isn’t a countermeasure for theft. It’s a range of tools anyone can use to their advantage. Many Macs come with a built-in iSight, but lack tools to use it in a more unorthodox way.

    Want to use your iMac as a motion alarm?
    - Want to keep a timelapse of how you look?
    - Do you want to know where your employees are?
    - Do you want a picture taken at a failed login?

    iSight Expert can not only do all those things, but also export a customized application for you that you can install on any iSight-equipped Mac, and will function as you have defined it;

    * Send Emails with it’s Geographic location and images.
    * Securely upload recent images and data to a web server
    * Make a movie of a month’s or week’s images
    * Take images at startup, login, logout, wakeup, failed passwords, or motion.
    * Act on a change of images or a face in the camera (e.g. run a script, play a song)

    And there is much more. iSight Expert can organise the sent images of all your equipped Macs, put them online automatically for you, or print them. In it’s slick interface, you can see at what date, and at what location the image was taken. It’s Growl enabled, meaning you can get nifty little dialogues when you get a new image.

    A beta-test is opening soon. Leave a comment, or email me to enter consideration. edit; I have had a lot of replies. I still need beta testers who have access to, and are able to test, a different application on OS X server. If you have both, be sure to email.

    Howto: An more secure OS X before Leopard (split).

    March 13, 2007 on 8:34 pm | In Apple, Hacking, How-To, Popular, Security

    secure2.jpg

    This is a folow-up on my earlier how-to “A more secure OS X before Leopard“. I have split this article from the results of the scan following the last article. I recommend following the first how-to before this one, if you haven’t read it, and see what potentially insecure defaults you can change without interfering with your daily activities. Some things touched there that I will not discuss here are;

    - Filevault
    - Turning on your Firewall
    - Bluetooth
    - Making a new, unprivileged user

    Further securing OS X is something for the truly paranoid, although some of the tips in here are handy for people who do feel like a checklist of things they could do to secure their Mac further. I am one of those very paranoid people, and I like to be in control of what happens on my computer. There are, once again, basic, intermediate, and advanced tips and little tricks in here, this time clearly divided in difficulty.

    1basic.jpg
    - Disable your Microphone input and / or iSight if you aren’t using them This hint, from the NSA Hardening guide, is a very good way to protect against any way for an intruder to physically eavesdrop on you, and any Quicktime component can access your iSight. There might be vulnerabilities looming on the horizon. The most desirable first is the iSight, as it has a real privacy concern if it were to be compromised. It’s as simple as a copy and paste into your Terminal. It won’t be painful, just open it for now.

    /usr/bin/sudo /bin/chmod a-rwx /System/Library/QuickTime/QuickTimeUSBVDCDigitizer.component/Contents/MacOS/QuickTimeUSBVDCDigitizer

    I will be explaining why I use full paths to commands later on. This simple line will make sure no user level process can access the module that interacts with the iSight. To restore;

    /usr/bin/sudo /bin/chmod a+r /System/Library/QuickTime/QuickTimeUSBVDCDigitizer.component/Contents/MacOS/QuickTimeUSBVDCDigitizer
    (I had this all mixed up. Thanks Greg)

    Many thanks to techslaves. To disable your Microphone as well, you can set it’s input volume to zero in the Sound preference pane, under the “Input” tab.

    - Enable Secure Keyboard Entry in the Terminal It’s that simple. It’s in the “File” menu in the menu bar.
    1ttem.png

    - Disable IPv6 if you aren’t using it. Why? Potential vector for attack. To fix this, go to the Network configuration pane. Select the connection you want to use for internet access, and click here;
    ipv61.jpg
    And now make sure it is set as below;
    ipv62.jpg

    - Disable automatic Movie playback. What if there were to be an iSight vulnerability by delivery in a Quicktime file? We wouldn’t want it to just play without us asking. Go to the Quicktime preference pane, browser tab;
    playmovies.png

    - Set your software updater to check more frequently. Of course, we like to be ready for fixes. This goes without any picture, because this is too trivial. Just go to the preference pane of Software Update.

    - Ensure that access for assistive devices is disabled. In the preference pane for Universal Access. You can also make your cursor insanely big here, which is nice.

    - Use a firewall accessory application like Glowworm FW Lite, or Little Snitch . Speaks for itself. Lets you decide if you want applications to connect to something.

    1intermediate.jpg
    - Set an Open Firmware Password. OF Passwords can be subverted in some ways (the password is nulled when RAM configuration is changed), but it is a hindrance. This works differently for PowerPC Macs and Intel Macs, because the latter use EFI and the other Open Firmware. For PowerPC, use the tool in Utilities to change your password. You can also boot with Command-Option-O-F pressed, to enter the OF prompt. From there, enter your newly set password, and type;
    setenv security-mode full

    To set full security mode, the most secure mode.
    For Intel Macs. Apple has not yet provided security extensions to the EFI. You can use the Open Firmware Password Utility to set an EFI password, but that’s about it. Perhaps in the future, we will see rEFIt become TPM-aware (see advanced section).

    - Use a more reliable DNS service. It may even speed up your internet. OpenDNS is dubbed by some to be more reliable and secure than an arbitrary DNS server of your ISP. No real argument against that. To set OpenDNS’s DNS servers as yours, go to the Network preference pane, and select the interface you use for internet access.
    dns.png
    Simply set this field, present under the TCP/IP tab in your interface of choice, to these addresses, or go to OpenDNS yourself to verify (hey, I could offer you IP’s of MY DNS server, so don’t thread lightly).

    - Set a login-window warning banner. (Courtesy of the Corsaire Report) Simply type;
    /usr/bin/sudo /usr/bin/open /Library/Preferences/com.apple.loginwindow.plist
    in the terminal. This opens the preference file of your loginwindow application.
    loginwindow 1.jpg

    Make sure where the suggestion for the password is, like my bogus text here, completely empty. Mine says “Grensschutzgruppe en Bas Haring”. Password hints may be a risk to the security of your system. Now, back on topic. Simply click the New Sibling button, and add the sibling LoginwindowText. Add some intimidating text, like;
    This is a private computer system and is for authorised use only.
    Any or all use of this system and all files on this system may be intercepted and monitored.
    Unauthorised or improper use of this system may result in disciplinary and/or legal action. By
    continuing to use this system you indicate your awareness of and consent to these terms and conditions
    of use.

    - Lock your keychain. By default, the keychain that stores your passwords, is always unlocked. No one can read your passwords, but programs are able to access your passwords, if they created the password. Use the Keychain Access application to set another password than your login password for the keychain. It will then prompt you for your keychain password every time an item is needed, and it will be open for a configurable period, which defaults to 5 minutes.
    keychain.jpg

    - Use Encrypted Disk Images. To secure file, or nest encrypted files even deeper in filevault, you can use the Disk Utility to create secure disk images.

    - Set a more critical umask. (command courtesy of Corsaire write-up) The default umask allows all users to read each other’s new files. This command disables this;
    /usr/bin/sudo /usr/bin/defaults write /Library/Preferences/.GlobalPreferences NSUmask 23

    - Enable Process Auditing. (command courtesy of Corsaire write-up) This will log commands executed by all users. One line;
    /usr/bin/sudo /bin/mkdir /var/account && /usr/bin/sudo /usr/bin/touch /var/account/acct && /usr/bin/sudo /usr/sbin/accton /var/account/acct
    It will now run from startup.

    - Force SSH to use SSH2. You can edit the ssh configuration like this;
    /usr/bin/sudo /usr/bin/nano /etc/sshd_config
    Now replace the line that reads “#Protocol 2, 1″ with “Protocol 2″. Lose the comment mark, otherwise it won’t work.

    - Use full paths to command names. This security measure, coined mostly by Rixstep (the author of the brilliant ACP), ensures Bash or defaults path poisoning is no longer an attack avenue. Although the bash developers didn’t consider it to be a real issue, Rixstep’s CLIX (an essential accessory to any power user, and it is free) has path resolving and builtin measures against path poisoning.

    - Keep an eye on startup scripts in launchd. Lingon can be used to monitor what starts up automatically. It’s an excellent GUI utility.

    - Keep an eye on running services. I use the simple iServeBox for this. A simple GUI to enable or disable services, handy if you know what you are doing.

    1advanced.jpg
    - Compile and run Bastille-OSX on a regular basis.Bastille for OS X is a hardening assessment tool. It goes recommended for anyone that knows what he or she is doing. Perl-Tk on OS X might be a useful resource in this effort.
    - Compile and implement SEDarwin. PPC-only for now, SEDarwin is an adaptation of the open Darwin kernel at the heart of OS X to support the Mandatory Access Control framework. It is, of course, based off SELinux.
    - Use the Trusted Platform Module in your Mac. This is, only if it has one. The first generation of Macbook Pro’s have a TPM, for example. Do an ioreg;

    /usr/sbin/ioreg | /usr/bin/grep -i tpm

    The output should look like this, and not any differently;

    | +-o TPM

    In this case, you got a TPM and after you have installed the new, very cool open-source drivers and utilities by Amit Singh, you can go use it with services you’d expect from it. As an advanced user, you could compile several tripwire-like solutions to hash files on disk and run them against a database of hashes stored in your TPM without having processor load, or bake your own solutions.

    This concludes my divided how-to on securing your Mac beyond its defaults. You can use the following resources to your advantage, like I did, and try to persuade people to watch security more on OS X. And no, I promise, there will be no more scanning. Be safe out there.

    PDF Guides:
    NSA’s Guide to Panther Hardening
    Corsaire’s Guide on Securing OS X Tiger
    Apple’s Document on Securing Tiger

    small edit; added instructions for Intel Mac OF password, consistently explained using the full path to programs, added TPM entry.

    digg this!

    Howto: A more secure OS X before Leopard.

    March 10, 2007 on 10:26 pm | In Apple, Hacking, How-To, Popular, Security

    secure.jpg
    edit: 12th of March; Follow-up availible; Click Here

    In this howto, I will show you some things I have done to secure OS X beyond its default settings. There are very basic, and some advanced things in here. I am in NO WAY LIABLE for ANY DAMAGE you might do to your Mac by messing around with the things I describe here, because it could very easily cut you off from the internet if you don’t know what you are doing, and you’ll be emailing me to death from some internet cafĂ© while receiving strange looks from people because you just ate your Mac’s supplied stickers.

    First off, there is some odd stuff going on with Tiger’s default security settings. Upon setting up your Mac, you are essentially it’s administrator. You can even change the password of the highest power on the computer, root. Therefore, if there ever would be a security danger, and you are running with such privileges, it is a lot easier to exploit the system. To fix this hassle, make a new user. Awww, you just had your whole Mac set up with a ton of programs and settings? What, you are expecting me for some migratory script? Well, suck it up, because it’s not done yet. Swallow the bitter pill for now, as I am still struggling with the ‘defaults’ command-line tool to copy all the settings. You can relieve some loss of settings by copying relevant preferences from (Initial User)/Library/Preferences to (New User)/Library/Preferences. NOTE: NOT /Library! The Library folder in your $HOME. (EDIT; gregr over at digg pointed this out: “- if you have your account set up the way you want, then create a new user as advised here but make that the admin one (just don’t call it admin or similar), put a good password on it and then make your user a ‘normal’ user.” This is, of course, a much more hassle-free way to do this. Thanks gregr!
    Also, people rarely realize - your firewall is off by default. Even better, we have an intensely impressive firewall option. First, here’s the gem; it’s hidden in the Sharing preference pane (what genius thought that one up?) under it’s own tab. And there, the fun begins.

    greyed 1.jpg
    What is all this then? Oh, remember, you created a new, unprivileged account. Just checking on you.

    Ok, unlock the thing, authenticate, and click the obvious ‘Start’ button. It’s on when it reads stop. Easy so far. Now, click the almost hidden “Advanced” button.

    advanced.jpg

    Ooh, doesn’t that sound yummy. “Stealth Mode”? Damn, screw all that, my Mac’s going to be like a fucking Stealth Plane! Uh, anyway, ignore the buzz for now and check it out; UDP filtering is off by default, this ‘Stealth mode’ thing is off, and logging too. Insane. Put them all on. Little note here; if you want to be a diehard bittorrent downloader and want to optimize other P2P traffic, you best leave the UDP filtering out. What does this leave for attackers? Network Time, 2 exploits in the last years, CUPS (Printing), 1 DoS exploit found and strangely, MS Word (use OpenOffice.org!).

    So, does this all do what it says? Nope. If you don’t want to share your printer, or share files over the Windows protocol, then these are left open, regardless of what you fiddle with in the preference panels. Bonjour is also always allowed in, and for some arcane reason, DNS is allowed outwards. This is almost like waiting for an exploit to happen. To somewhat augment these insane defaults, you can open a terminal and fiddle around with the ipfw command. You will need priviledges, gained by using sudo. You can also use Waterroof, a visual editor of your firewall rules. Dandy.
    Anyway, the UDP filtering by default just allows anything Bonjour and Printing Server in. To fix this strange behaviour, just use ipfw;

    sudo ipfw del 20321
    followed by;
    ipfw del 20322
    Only do this with all settings in the ‘Advanced’ tab enabled! You might end up deleting the wrong firewall records. Anyway, what does this do to secure you? With inbound Bonjour UDP and CUPS UDP forbidden, foreign hosts will not be able to see what patchlevel you have (OS Version and Hardware type) and not be able to use CUPS exploits. It disables printer sharing, iTunes sharing, and other Bonjour-services.

    Now, the Firewall a bit more secure, you can check to make sure Bluetooth is off by default (it is ON and discoverable on new users by default), and that it is set to non-discoverable. Now, click the Bluetooth icon in the menu bar, and go to Bluetooth Preferences.
    blue.jpg
    Ensure that the checkmarks are like in the picture. Most important here is the field with the key icon, which means authentication is on. Some are off by default, an insanely stupid move. There are lots and lots of Bluetooth vulnerabilities out there, and the first worm for OS X used Bluetooth to propagate itself.

    Other common security fixes for everyday life is ensuring you log into gmail with https://, and browse Gmail with https://. Gmail drops the secure session after login, but you can force it by typing https://gmail… in the browser. In Apple Mail, make sure you have encryption enabled. Otherwise, you can secure a non-secure connection to a server you have SSH access to with the following terminal command;

    sudo ssh2 -l username@server.com -L 25:server.com:25 -L 110:server.com:110 server.com
    This essentially forwards the ports 25, and 110 (respectively SMTP and POP3, replace for IMAP or IMAPS with adequate port numbers) to the server in question and ‘tunnels’ the traffic through SSH, encrypted et al. You can now set the server settings in Mail for incoming to ‘localhost:110′ (without the brackets, doh) and outgoing to ‘localhost:25′. The ssh2 command forces SSH2.0, for more security.

    For Laptop safety, you can first disable the most stupid feature in history, namely auto-login. It will make it much easier for people who steal your laptop to make use of it. This included people with sensitive data, who, if they don’t mind performance degradation, should use my settings;

    filevault.jpg
    Yup, disable auto-login, make sure there is a pass on your screen saver / wake-up, ensure virtual memory is encrypted (performance drop here) and Filevault is on with a very complex password that stretches the imagination. (and don’t start asking me why this is greyed out)

    Okay, so that all makes us a bit more secure and aware of our security. For other security, in the sense of anonymous internet access, you can use Vidalia with Tor. There was a recent proof-of-concept attack on Tor, but it’s not to be used as a completely anonymizing tool - it does it’s work very well, though, and it goes recommended for any computer for me.

    This concludes this howto to harden OS X. If you have the abilities to compile something, please take a look at Bastille for OS X, whose co-author Jay Beale showed many of the faults in defaults in this document. It requires X11, the developer tools, and the latest developer release of Perl-Tk to function, and it can assess your system security with a number. It will automate many of the things I have advised and howto’d here in a friendly Tk-dialog. For now, have fun hardening your OS, and remember, hardening breaks future exploits! With the surge in Apple’s marketshare, we will start seeing malware.

    Since this article got dugg, I have gotten a lot of feedback. Don’t miss these useful tips from readers;

    - There is an often overlooked feature in Safari’s preferences to disable the automatic opening of disk images. This feature has had many exploits since it’s advent (contributed on digg by newbill123.
    - For the truly paranoid, set the Firmware Password with the tool in your /Applications/Utilities folder to ensure no CD is bootable or the settings immutable without a password (contributed on digg by the ‘friendly’ frozendice).
    - I will touch on more hints, tips, and hardening documents in the next how-to.

    digg this!