16 Mar
   Filed Under: Unfiled   

There has been a whole buzz of news in graphics, GUI, Open Source, and all topics in between in this week, prompting for a new weekly; The Graphic Friday. I’ve mostly decided to add this weekly because there has been an influx of demand for more (regular) posts concerning typography and graphic design (or eye candy, whatever you’d like to call it ;)).

Everyone’s favorite linux distribution, Ubuntu, has gotten a website redesign. A lot of negative feedback was unearthed with the redesign, but I must say, I like it. It’s gotten a sense of information architecture now (most needed information, like a link to the forum, a link to the files, etc), and it’s, well, in line with the general ‘Human’ theme they have had going on in Gnome for a long time now – complete with rounded corners. Ooh, rounded corners, they just seem to be popping up everywhere, don’t they?

Anyway, for even sexier Open Source desktops, a Beryl equivalent of Gnome-Look was also launched today; Beryl-Themes. For those unacquainted with Beryl (you must have been living under a mountain to miss this whole ‘Linux’ thing), it’s a super-dope 3d desktop, complete with theming abilities and productivity enhancements like zoom (as seen in OS X), ‘exposé) (as seen in OS X), and negative (as seen in any OS).

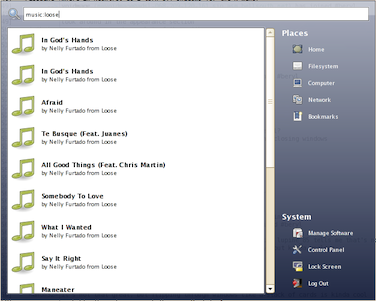
And even more sexy UI news from Open-Source land; Neil J. Patel, a new true innovator in the GNOME project (GNOME is as much as the entire UI in a lot of Linux distributions, and a host of other features that are essential to any desktop operating system) released some screenshots of Affinity, a new GNOME search tool (not quite unlike OS X’s Spotlight).

affinity-beagle 1.png

That’s Affinity set loose on Beagle’s backend (Beagle is a search engine, metadata indexer, much like Tiger’s Spotlight 1.01).

I want to conclude this one Open-Source edition of the Graphic Friday with a film I have just seen, and I rate second best anime next to Akira; Howl’s Moving Castle (grammar nazi cataclysm avoided by Jelmar). It’s immense – what a great movie. I can absolutely recommend it to anyone who enjoys a whole lot of eye candy and weird, speampunk-esque worlds. Impeccable animation and a very strong plot make it a joy to watch.

14 Mar
   Filed Under: Unfiled   

It’s Typographic Wednesday again, time for some nice insider news from the typography scene.

Helvetica; the movie has started showing! I am very excited and I will be sure to buy the movie as soon as it comes out. It’s already been dubbed ‘the most interesting movie on Graphic Design’, and has received general praise. Keep an eye on this movie, featuring the biggest star in typography to date.

The typographic blog Type for You has a nice interview with Wim Crouwel, a Dutch type designer who did works like the New Alphabet and Gridnik (both now for sale at the Foundry). He’s also, incidentally, from the same city – while I study in Groningen, he spent most of his life there.
WimCrouwel.gif

Fabrizio Schiavi is a great type designer. He’s just released a new, beautiful stencil font that redefines the look of stencil. Meet Siruca;

sr_confer.gif

Fabrizio Schiavi’s font portfolio includes the beautiful Sys, and CP Company.

That’s it, for now, some smoky words,

420749287_13a5034801.jpg

image by fliegender on flickr.

13 Mar
   Filed Under: Apple, How-To, Popular   

secure2.jpg

This is a folow-up on my earlier how-to “A more secure OS X before Leopard“. I have split this article from the results of the scan following the last article. I recommend following the first how-to before this one, if you haven’t read it, and see what potentially insecure defaults you can change without interfering with your daily activities. Some things touched there that I will not discuss here are;

– Filevault
– Turning on your Firewall
– Bluetooth
– Making a new, unprivileged user

Further securing OS X is something for the truly paranoid, although some of the tips in here are handy for people who do feel like a checklist of things they could do to secure their Mac further. I am one of those very paranoid people, and I like to be in control of what happens on my computer. There are, once again, basic, intermediate, and advanced tips and little tricks in here, this time clearly divided in difficulty.

1basic.jpg
Disable your Microphone input and / or iSight if you aren’t using them This hint, from the NSA Hardening guide, is a very good way to protect against any way for an intruder to physically eavesdrop on you, and any Quicktime component can access your iSight. There might be vulnerabilities looming on the horizon. The most desirable first is the iSight, as it has a real privacy concern if it were to be compromised. It’s as simple as a copy and paste into your Terminal. It won’t be painful, just open it for now.

/usr/bin/sudo /bin/chmod a-rwx /System/Library/QuickTime/QuickTimeUSBVDCDigitizer.component/Contents/MacOS/QuickTimeUSBVDCDigitizer

I will be explaining why I use full paths to commands later on. This simple line will make sure no user level process can access the module that interacts with the iSight. To restore;

/usr/bin/sudo /bin/chmod a+r /System/Library/QuickTime/QuickTimeUSBVDCDigitizer.component/Contents/MacOS/QuickTimeUSBVDCDigitizer
(I had this all mixed up. Thanks Greg)

Many thanks to techslaves. To disable your Microphone as well, you can set it’s input volume to zero in the Sound preference pane, under the “Input” tab.

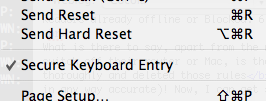
Enable Secure Keyboard Entry in the Terminal It’s that simple. It’s in the “File” menu in the menu bar.
1ttem.png

Disable IPv6 if you aren’t using it. Why? Potential vector for attack. To fix this, go to the Network configuration pane. Select the connection you want to use for internet access, and click here;
ipv61.jpg
And now make sure it is set as below;
ipv62.jpg

Disable automatic Movie playback. What if there were to be an iSight vulnerability by delivery in a Quicktime file? We wouldn’t want it to just play without us asking. Go to the Quicktime preference pane, browser tab;
playmovies.png

Set your software updater to check more frequently. Of course, we like to be ready for fixes. This goes without any picture, because this is too trivial. Just go to the preference pane of Software Update.

Ensure that access for assistive devices is disabled. In the preference pane for Universal Access. You can also make your cursor insanely big here, which is nice.

Use a firewall accessory application like Glowworm FW Lite, or Little Snitch . Speaks for itself. Lets you decide if you want applications to connect to something.

1intermediate.jpg
Set an Open Firmware Password. OF Passwords can be subverted in some ways (the password is nulled when RAM configuration is changed), but it is a hindrance. This works differently for PowerPC Macs and Intel Macs, because the latter use EFI and the other Open Firmware. For PowerPC, use the tool in Utilities to change your password. You can also boot with Command-Option-O-F pressed, to enter the OF prompt. From there, enter your newly set password, and type;
setenv security-mode full

To set full security mode, the most secure mode.
For Intel Macs. Apple has not yet provided security extensions to the EFI. You can use the Open Firmware Password Utility to set an EFI password, but that’s about it. Perhaps in the future, we will see rEFIt become TPM-aware (see advanced section).

Use a more reliable DNS service. It may even speed up your internet. OpenDNS is dubbed by some to be more reliable and secure than an arbitrary DNS server of your ISP. No real argument against that. To set OpenDNS’s DNS servers as yours, go to the Network preference pane, and select the interface you use for internet access.
dns.png
Simply set this field, present under the TCP/IP tab in your interface of choice, to these addresses, or go to OpenDNS yourself to verify (hey, I could offer you IP’s of MY DNS server, so don’t thread lightly).

Set a login-window warning banner. (Courtesy of the Corsaire Report) Simply type;
/usr/bin/sudo /usr/bin/open /Library/Preferences/com.apple.loginwindow.plist
in the terminal. This opens the preference file of your loginwindow application.
loginwindow 1.jpg

Make sure where the suggestion for the password is, like my bogus text here, completely empty. Mine says “Grensschutzgruppe en Bas Haring”. Password hints may be a risk to the security of your system. Now, back on topic. Simply click the New Sibling button, and add the sibling LoginwindowText. Add some intimidating text, like;
This is a private computer system and is for authorised use only.
Any or all use of this system and all files on this system may be intercepted and monitored.
Unauthorised or improper use of this system may result in disciplinary and/or legal action. By
continuing to use this system you indicate your awareness of and consent to these terms and conditions
of use.

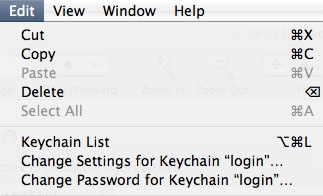
Lock your keychain. By default, the keychain that stores your passwords, is always unlocked. No one can read your passwords, but programs are able to access your passwords, if they created the password. Use the Keychain Access application to set another password than your login password for the keychain. It will then prompt you for your keychain password every time an item is needed, and it will be open for a configurable period, which defaults to 5 minutes.
keychain.jpg

Use Encrypted Disk Images. To secure file, or nest encrypted files even deeper in filevault, you can use the Disk Utility to create secure disk images.

Set a more critical umask. (command courtesy of Corsaire write-up) The default umask allows all users to read each other’s new files. This command disables this;
/usr/bin/sudo /usr/bin/defaults write /Library/Preferences/.GlobalPreferences NSUmask 23

Enable Process Auditing. (command courtesy of Corsaire write-up) This will log commands executed by all users. One line;
/usr/bin/sudo /bin/mkdir /var/account && /usr/bin/sudo /usr/bin/touch /var/account/acct && /usr/bin/sudo /usr/sbin/accton /var/account/acct
It will now run from startup.

Force SSH to use SSH2. You can edit the ssh configuration like this;
/usr/bin/sudo /usr/bin/nano /etc/sshd_config
Now replace the line that reads “#Protocol 2, 1” with “Protocol 2”. Lose the comment mark, otherwise it won’t work.

Use full paths to command names. This security measure, coined mostly by Rixstep (the author of the brilliant ACP), ensures Bash or defaults path poisoning is no longer an attack avenue. Although the bash developers didn’t consider it to be a real issue, Rixstep’s CLIX (an essential accessory to any power user, and it is free) has path resolving and builtin measures against path poisoning.

Keep an eye on startup scripts in launchd. Lingon can be used to monitor what starts up automatically. It’s an excellent GUI utility.

Keep an eye on running services. I use the simple iServeBox for this. A simple GUI to enable or disable services, handy if you know what you are doing.

1advanced.jpg
Compile and run Bastille-OSX on a regular basis.Bastille for OS X is a hardening assessment tool. It goes recommended for anyone that knows what he or she is doing. Perl-Tk on OS X might be a useful resource in this effort.
Compile and implement SEDarwin. PPC-only for now, SEDarwin is an adaptation of the open Darwin kernel at the heart of OS X to support the Mandatory Access Control framework. It is, of course, based off SELinux.
Use the Trusted Platform Module in your Mac. This is, only if it has one. The first generation of Macbook Pro’s have a TPM, for example. Do an ioreg;

/usr/sbin/ioreg | /usr/bin/grep -i tpm

The output should look like this, and not any differently;

| +-o TPM

In this case, you got a TPM and after you have installed the new, very cool open-source drivers and utilities by Amit Singh, you can go use it with services you'd expect from it. As an advanced user, you could compile several tripwire-like solutions to hash files on disk and run them against a database of hashes stored in your TPM without having processor load, or bake your own solutions.

This concludes my divided how-to on securing your Mac beyond its defaults. You can use the following resources to your advantage, like I did, and try to persuade people to watch security more on OS X. And no, I promise, there will be no more scanning. Be safe out there.

PDF Guides:
NSA's Guide to Panther Hardening
Corsaire's Guide on Securing OS X Tiger
Apple's Document on Securing Tiger

small edit; added instructions for Intel Mac OF password, consistently explained using the full path to programs, added TPM entry.

digg this!
13 Mar
   Filed Under: Apple   

I love my Mac. It’s become an extension of my mind. I’ve never felt the need for bottomless praise for Apple, but I am positive about their products. This contention really came to a screeching halt when my first Macbook Pro started melting. Yes, the battery got hot to the point of bending open and my case was bent as well. In short, Apple had this problem more, because they shipped my Macbook Pro to America (all the way from the Netherlands to California) immediately, without further discourse. When I called Applecare, they were quite adamant on giving me back exactly the same model. You know, uh, the same model, that almost burned down my house. I demanded a proper refund, or threatened to take legal action because of the threat they had posed to my health.
In the discussion, I lost 3 months, in which I was forced to do all my design work on an old Windows PC I still had. There was no question of a replacement model. I eventually got a speed upgrade of 0.16 Ghz (from a 1.83 MBP to a 2.0 Ghz MBP), far lower than my demand but they weren’t willing to settle, and I badly needed my workstation back. Upon receiving it, I got a new Magsafe, my old one had already gone quite bad;

0borkedmag.jpg
It’s bending angle is less than optimal, resulting in a sort of lump on the cable I saw at friends’ Macbooks too. I went to the Apple store in my neighborhood, and they claimed it was my fault, that all of this couldn’t be sent to Apple, etcetera. If you have had this problem, you were probably served similarly. However, the truth is, Apple has been screwing you.

0-fucked.jpg

As you can see, this new Magsafe adapter features a much wider angle to bend it in, as it’s gotten essentially the same treatment as the old, proven design. Wha-? Rushed out, these machines? Naah, I just had a Macbook Pro that started melting on me, and uh, a white Macbook Core 2 Duo with a crack in the casing, and my new Macbook Pro’s paint is coming off and it’s DVD/CD-drive has almost completely failed and cost me quite some expensive DVD’s… Well, suffice to say, I will have to go to the Apple store soon and deliver these two laptops again, because they, too, are broken. I really love this hardware, but I wish it just wasn’t rushed this hard.

If you had a similar treatment as me, but are still in the process of dealing with Apple, show them these pictures. They have silently replaced the Magsafe with a better version, and you are entitled to this fix.

digg this!

12 Mar
   Filed Under: Apple   

Because people had significant trouble with the unwieldy double article, I split this article in two parts;

The Followup; An even more secure OS X before Leopard

Scanning my Audience; a port scan following the first how-to.

11 Mar
   Filed Under: How-To   

inspector.jpg

In this new quick and dirty how-to, I want to address how I secure my personal network, consisting of a few rogue Windows computers (I manage a network that connects two houses with one internet connection at home) and two Macs, a FreeBSD server and a Linux server (my computers). It’s got wired and wireless access points, and my servers use wired connections. I use several tools on all platforms that you can all test for yourself without even touching your computer with the latest 2.0 of the Backtrack live CD, a GNU / Linux security distribution that features some hot tools for you to use out of the box. Make sure it supports your hardware, though, or you will be in for a very boring ride.

First off, wireless networking is a very big hole in the security of any network. It’s trivial to penetrate many networks, in spite of encryption, MAC filtering (filtering devices by their hardware address) and other security mechanisms, it adds an attack vector for anyone with malicious intent. For rather personal reasons (I don’t like people whining about internet being a hassle) and fun and profit (more about this later on) I chose to keep my wireless access point.
What’s always important to know, is who or what is on your network. The primary tool I use to enumerate hosts on my networks is Nmap, by the brilliant Fyodor. In any environment that’s got a shell (even Windows has a shell, check out Cygwin), Nmap is trivial to automate, and it’s output is trivial to process. It runs nice and fast, and it has a host of options. Check out this shell command as an example to find hosts on your network and get the output in a format that is readable and even printable by dope things like Geektool (OS X), to put the output on your desktop.
'/opt/local/bin/nmap' -sP 192.168.2.0/24 | awk '/192.168./ {print $2, $6}'
Note; /opt/local/bin/ is my path to nmap. Use your own. The -sP command does a ping sweep of all hosts in the 192.168.2. subnet. In other words, the netmask is 255.255.255.0, or /24. You should change this to your network’s IP address range, as well as the two fields in awk. The output of the command looks like this;

192.168.2.1 up.
192.168.2.2 up.
192.168.2.4 up.

Now, that’s just handy. Now we can already know what ping-replying people are on the network. If there seems to be a bit of a delay, and our scan doesn’t return results, we can use the more advanced options of Nmap – which require privileges. Some options to consider; -sL; the list scan. Will mass-scan a list of hosts, which you can use with the following, useful flags; -v for verbose mode, extra output! You can use the -PR, -P0 or -PN options to respectively use ARP for pinging, not ping at all, or use ICMP netmask requests (a clever one which can bypass Windows and OS X ‘stealth’ mode firewalls default ICMP rules). With the -O flag, you can also let Nmap try to fingerprint the hosts’ OS, which can be handy, as well as giving a guess of the network device’s hardware vendor with the aforementioned verbose mode. There are many open-source programs to quickly or otherwise uniquely enumerate or find hosts on a network, and I leave it to the reader to vary with programs like hping3, arping, fping, scanrand and others to get different or better results. I use arping and scanrand (Dan, the man!) on a regular basis, because each has it’s own advantages.

A commonly-used attack on networks once in is using a poisoning attack to capture traffic. Virtually all routers operate as switches today, which means they don’t just send out all traffic on the network to anyone, but switch it between appropriate hosts. To keep track of all the hardware addresses and routing between platforms in the traditional IPv4, the ARP protocol is used. My very, very favorite tool for fucking with ARP (excuse my language) is ettercap, but most people, for the safety of their own network, will merely want to keep tabs to see if people aren’t doing nasty shit. For this purpose, arpscan is a very fine choice. It compiles cleanly on virutally all operating systems (I don’t know about Windows, but this is owning your network open-source style, not borked-lego-interface style) and it sends an email to your local account when some suspicious activity occurs. Suspicious could be someone new seen on the network, or someone doing real nasty stuff (MAC spoofing / ARP poisoning). You can always manage these messages with the most owning open-source Mail program, pine, or simply use the command-line tool mail.
Offensive network defense is sometimes a good idea if someone won’t leave the network when asked politely. Make sure you know what you are doing, and use Backtrack, or any UNIX with ettercap to use the dark side of… ARP (and a host of other attacks!).
ettercap.jpg

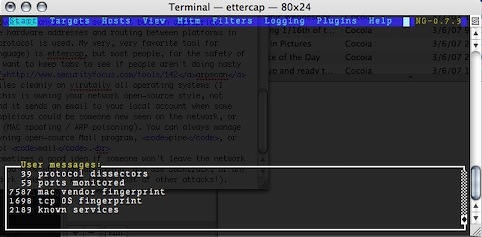
Say hello to ettercap -C. Ettercap obviously requires privileges, and it can be used to sniff out traffic first, but also make a nice host list and perform attacks on these hosts. The -C option uses by favorite interface system, Curses, but if your X11 has GTK, you can download ettercap-gtk and run it in it’s own window, with a ‘real’ interface. It can, obviously, also be ran as a command-line tool.
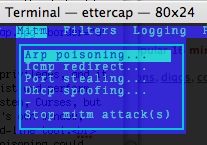
If you do not know what you are doing, fooling around with ARP Poisoning could break a network. Yes, you can get in dire trouble if you really start to fuck around with this in places other than your own network. Now, if you don’t mind your router being harassed by routing the traffic, you can disable internet for a host by simply not changing your routing settings, and performing ARP poisoning with ettercap. The hosts’ traffic will be routed through the router, to your computer, which will drop it. Incidentally, this often means the host sends it’s IM login info several times, which ettercap will display for you.
arp.jpg
Use this attack, with the ‘remote’ option. Don’t forget to use the ‘Stop mitm attack(s)’ when you are done. The console should provide you with output like the dropped packets and passwords. Configure logging to a convenient file in the logging tab, and make sure you have your router configured as Target 1, and the victim as Target 2 in the host list (under Hosts, obviously). Dandy. You can mess around with other, potentially destructive options on your own network at your own discretion. Just remember, I didn’t break it.
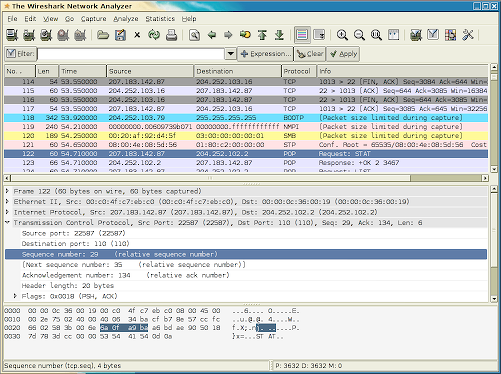
Now, what else can we do to own a network? Well, the former Ethereal (now Wireshark) is an excellent cross-platform (Nmap-cross platform, Windows users, go wild) packet sniffer. You can use it to take a more in-depth look at your traffic, as it can often sniff out raw wireless packets too, and login information. The convenient protocol coloring shows you what part of the network traffic is what, even measured in percentages. Think that sounds nice? Here’s an obligatory screenshot.
front_screen_full 1.png

Ooh, pretty colors. Remember you can always check all these tools out hassle-free if you have a Backtrack-compatible setup.

This should give you some pointers on what steps you can take to feel like you are owning your network a bit more. Remember to look at the tools, read the documentation and be creative. The only way to control a network is to get in touch with the technical side.

digg this!