
edit: 12th of March; Follow-up availible; Click Here
In this howto, I will show you some things I have done to secure OS X beyond its default settings. There are very basic, and some advanced things in here. I am in NO WAY LIABLE for ANY DAMAGE you might do to your Mac by messing around with the things I describe here, because it could very easily cut you off from the internet if you don’t know what you are doing, and you’ll be emailing me to death from some internet café while receiving strange looks from people because you just ate your Mac’s supplied stickers.
First off, there is some odd stuff going on with Tiger’s default security settings. Upon setting up your Mac, you are essentially it’s administrator. You can even change the password of the highest power on the computer, root. Therefore, if there ever would be a security danger, and you are running with such privileges, it is a lot easier to exploit the system. To fix this hassle, make a new user. Awww, you just had your whole Mac set up with a ton of programs and settings? What, you are expecting me for some migratory script? Well, suck it up, because it’s not done yet. Swallow the bitter pill for now, as I am still struggling with the ‘defaults’ command-line tool to copy all the settings. You can relieve some loss of settings by copying relevant preferences from (Initial User)/Library/Preferences to (New User)/Library/Preferences. NOTE: NOT /Library! The Library folder in your $HOME. (EDIT; gregr over at digg pointed this out: “- if you have your account set up the way you want, then create a new user as advised here but make that the admin one (just don’t call it admin or similar), put a good password on it and then make your user a ‘normal’ user.” This is, of course, a much more hassle-free way to do this. Thanks gregr!
Also, people rarely realize – your firewall is off by default. Even better, we have an intensely impressive firewall option. First, here’s the gem; it’s hidden in the Sharing preference pane (what genius thought that one up?) under it’s own tab. And there, the fun begins.

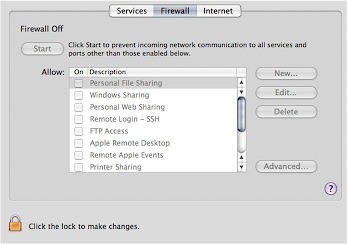
What is all this then? Oh, remember, you created a new, unprivileged account. Just checking on you.
Ok, unlock the thing, authenticate, and click the obvious ‘Start’ button. It’s on when it reads stop. Easy so far. Now, click the almost hidden “Advanced” button.

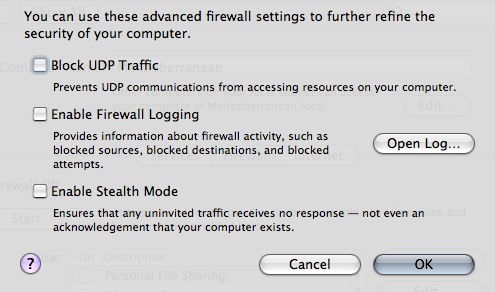
Ooh, doesn’t that sound yummy. “Stealth Mode”? Damn, screw all that, my Mac’s going to be like a fucking Stealth Plane! Uh, anyway, ignore the buzz for now and check it out; UDP filtering is off by default, this ‘Stealth mode’ thing is off, and logging too. Insane. Put them all on. Little note here; if you want to be a diehard bittorrent downloader and want to optimize other P2P traffic, you best leave the UDP filtering out. What does this leave for attackers? Network Time, 2 exploits in the last years, CUPS (Printing), 1 DoS exploit found and strangely, MS Word (use OpenOffice.org!).
So, does this all do what it says? Nope. If you don’t want to share your printer, or share files over the Windows protocol, then these are left open, regardless of what you fiddle with in the preference panels. Bonjour is also always allowed in, and for some arcane reason, DNS is allowed outwards. This is almost like waiting for an exploit to happen. To somewhat augment these insane defaults, you can open a terminal and fiddle around with the ipfw command. You will need priviledges, gained by using sudo. You can also use Waterroof, a visual editor of your firewall rules. Dandy.
Anyway, the UDP filtering by default just allows anything Bonjour and Printing Server in. To fix this strange behaviour, just use ipfw;
sudo ipfw del 20321 followed by;
ipfw del 20322
Only do this with all settings in the ‘Advanced’ tab enabled! You might end up deleting the wrong firewall records. Anyway, what does this do to secure you? With inbound Bonjour UDP and CUPS UDP forbidden, foreign hosts will not be able to see what patchlevel you have (OS Version and Hardware type) and not be able to use CUPS exploits. It disables printer sharing, iTunes sharing, and other Bonjour-services.
Now, the Firewall a bit more secure, you can check to make sure Bluetooth is off by default (it is ON and discoverable on new users by default), and that it is set to non-discoverable. Now, click the Bluetooth icon in the menu bar, and go to Bluetooth Preferences.

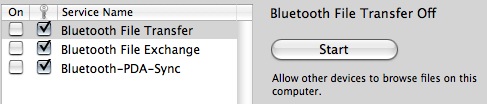
Ensure that the checkmarks are like in the picture. Most important here is the field with the key icon, which means authentication is on. Some are off by default, an insanely stupid move. There are lots and lots of Bluetooth vulnerabilities out there, and the first worm for OS X used Bluetooth to propagate itself.
Other common security fixes for everyday life is ensuring you log into gmail with https://, and browse Gmail with https://. Gmail drops the secure session after login, but you can force it by typing https://gmail… in the browser. In Apple Mail, make sure you have encryption enabled. Otherwise, you can secure a non-secure connection to a server you have SSH access to with the following terminal command;
sudo ssh2 -l username@server.com -L 25:server.com:25 -L 110:server.com:110 server.com
This essentially forwards the ports 25, and 110 (respectively SMTP and POP3, replace for IMAP or IMAPS with adequate port numbers) to the server in question and ‘tunnels’ the traffic through SSH, encrypted et al. You can now set the server settings in Mail for incoming to ‘localhost:110′ (without the brackets, doh) and outgoing to ‘localhost:25′. The ssh2 command forces SSH2.0, for more security.
For Laptop safety, you can first disable the most stupid feature in history, namely auto-login. It will make it much easier for people who steal your laptop to make use of it. This included people with sensitive data, who, if they don’t mind performance degradation, should use my settings;

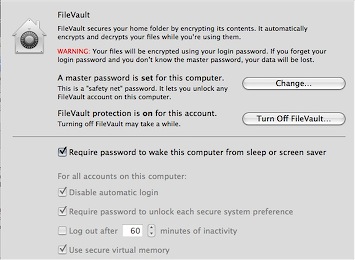
Yup, disable auto-login, make sure there is a pass on your screen saver / wake-up, ensure virtual memory is encrypted (performance drop here) and Filevault is on with a very complex password that stretches the imagination. (and don’t start asking me why this is greyed out)
Okay, so that all makes us a bit more secure and aware of our security. For other security, in the sense of anonymous internet access, you can use Vidalia with Tor. There was a recent proof-of-concept attack on Tor, but it’s not to be used as a completely anonymizing tool – it does it’s work very well, though, and it goes recommended for any computer for me.
This concludes this howto to harden OS X. If you have the abilities to compile something, please take a look at Bastille for OS X, whose co-author Jay Beale showed many of the faults in defaults in this document. It requires X11, the developer tools, and the latest developer release of Perl-Tk to function, and it can assess your system security with a number. It will automate many of the things I have advised and howto’d here in a friendly Tk-dialog. For now, have fun hardening your OS, and remember, hardening breaks future exploits! With the surge in Apple’s marketshare, we will start seeing malware.
Since this article got dugg, I have gotten a lot of feedback. Don’t miss these useful tips from readers;
- There is an often overlooked feature in Safari’s preferences to disable the automatic opening of disk images. This feature has had many exploits since it’s advent (contributed on digg by newbill123.
- For the truly paranoid, set the Firmware Password with the tool in your /Applications/Utilities folder to ensure no CD is bootable or the settings immutable without a password (contributed on digg by the ‘friendly’ frozendice).
- I will touch on more hints, tips, and hardening documents in the next how-to.


There is no need to copy settings and stuff, in order to work as a non-administrator. Instead, create a new account, make this new one the administrator account and remove the administrator property from your usual and firstly created account.
That’s what I did, and it works just fine.
Stupid me, should have read the full paragraph, before commenting :/
No problem gerddie, it’s good to have it emphasized. Thanks again.
Block UDP traffic? Are you an idiot?
ed. : I have cited this comment for exempliary reasons. I am not making a howto to make the most media-center like user-friendly networking out-of-the-box Mac. I am making a how-to in which I advise what you can do to break future exploits. If you have no use for UDP and want to filter it, this document may be of help. I advise of the breaking of services and more, at least two times.
$ sudo ipfw del 20321 && ipfw del 20322
Password:
ipfw: socket: Operation not permitted
tried it again and got this…
$ sudo ipfw del 20321 && ipfw del 20322
ipfw: rule 20321: setsockopt(IP_FW_DEL): Invalid argument
Any idea why this failed?
I made a mistake to use the logical AND operator &&. You can use the two commands that I condensed into one line like this;
sudo ipfw del 20321
and then type sudo ipfw del 20322 again.
The reason for the new error was that 20321, the rule, was already deleted. You can now go on and delete the other one, if you like.
“secure OS X beyond it’s default settings” should be “secure OS X beyond its default settings”.
Can you switch to dark text on a light background?
What good is it to turn on your firewall when you have no services running in System Preferences->Sharing->Services? If no services are running, then any requests on those ports will go unanswered. In this case the firewall does nothing for you.
Its like locking all the doors on a house that has no doors.
Scratch that. I re-read the part about Bonour and CUPS. Firewall on is good. Nice read.
Patrick – As soon as I saw the white on black text, I pressed ctrl-option-Apple-8 and inverted the colors on my screen. Made it much easier to read. Check under System Preferences -> Universal Access -> Seeing if it’s not working for you.
Glad you edited your first section with gregr’s suggestion, but then you hit me with the F-word. Your tutorial is too colloquial. Too kiddie speak-like. I can’t take you seriously.
I’m very sorry. For you. Nor can I.
So, it turns out that I enabled my Firewall some time ago, probably when I got my Mac in 2005 but I’m not sure. Your article prompted me to look at the log and I was wondering if you had any idea what messages like these mean:
Mar 9 16:51:10 rtwpb ipfw: 12190 Deny TCP 74.121.187.137:3233 75.209.44.111:5900 in via ppp0
Mar 10 13:27:56 rtwpb ipfw: Stealth Mode connection attempt to TCP 75.211.49.181:49600 from 213.229.33.228:80
Mar 10 13:43:41 rtwpb ipfw: 20000 Deny ICMP:8.0 75.212.164.54 75.211.49.181 in via ppp0
Liked your article – but please change the “it’s” in the first sentence to “its.” The former is the contraction of “it is,” while the latter is the possessive of “it.” That is the meaning you meant to employ. Just as the possessives “his” and “her” have no apostrophe, neither does “its.”
Thanks.
Good primer and extra steps to take–my only concern regards using the command line to configure ipfw, and mixing it with using the Control Panel GUI, as i’ve heard that it’s not recommended to mix them together. Any comments about this?
No, not really. First, there is a GUI for firewall rulesets, even for OS X. It’s called Waterroof – and it’s free. Second of all, you can always disable your firewall. No problems there. The issue, I think, that you’re afraid to run into, is that the GUI would delete manually-inserted rules, or leave otherwise manually tweaked rules alone, breaking the configuration. Now, I wouldn’t worry about that unless you are defining very broad ranges of ports, addresses, or connections to specifically deny, instead of allow.
“secure OS X beyond it’s default settings” should be “secure OS X beyond its default settings”.
Chris:
the reason for the failure is that you need to run sudo for each command:
sudo ipfw del 20321 && sudo ipfw del 20322
the error you saw was on the second of the compound command. When you ran it a second time, 20321 was already deleted, so it errored out.
you shouldn’t run commands like that unless you’re 100% sure of what you’re doing and are almost as sure that nothing’s gonna fail. with &&, it gets harder to understand what went wrong as you add more commands.
Rafe:
The firewall is a way of insuring that services are NOT running and no application is able to receive connections on blocked ports. If some rogue piece of software decides to listen for connections on port 143, without a firewall, the service will go unchecked and will become a security risk. Running with no services and no firewall is a false sense of security. Running with no services and with the firewall on is like building a wall around your house with no doors.
I only wish that the OSX firewall had a built-in rule editor for both inbound and outbound rules and be configurable on a per-host basis (ie: allow inbound ssh, but only from a specific host).
Important Note: “Blocking UDP Traffic” will also disable Windows networking folder access. Actually it doesn’t disable it, it just won’t allow the Windows computer and the Mac to communicate (effectively disabling it).
You’ll be trying to figure out why it doesn’t work after you click that option and banging your head on your desk for days after you’ve forgotten you clicked it (said from experience a few months back)…
Ed. : Actually, a persistent rule in the table which I advise to get deleted is NetBIOS. This in the later how-to, but Windows File Sharing is supposed to pass through the firewall, at least, with default settings, no matter what you do in the configuration GUI.
Nice. Not bad. Slightly enlightening, but I had to go screw with the firewall to get a netcat listener going for me anyways. Didn’t play with the advanced settings though.
Anyways, lots o’ Macintosh fans say that Mac OS X is secure by default. I stay on the side of saying no OS is secure by default. Either way, this is a great article. Thanks. :)
–Dalton
I really liked your article. A bunch of good tips. Thanks.
http://www.nsa.gov/snac/downloads_macX.cfm?MenuID=scg10.3.1.1
Ed. This may or may not be clear, this is the NSA’s guide to hardening OS X, which I will touch on more in my next howto.
for the ultra paranoid; set the computers open firmware password…
As far as the UDP/Stealth options go, I wonder if XP has similar options?
Most corporate solutions for firewalls, and I believe even the XP SP2 Firewall deny ICMP-Echo Request (Stealth Mode) or have an option for it. I always used Norton’s backend, Sygate Personal Firewall. UDP Filtering can be turned on by disabling sensitiv UDP services in the advanced preferences of the XP Firewall.
Great post. Thanks for sharing that. I was going to write an article about this but it looks like you’ve covered it pretty well.
————–
http://www.mostofmymac.com
EVERYTHING begins and ends with a good admin password. Have the tightest software setup and change one thing and a bad password compromises everything firewall or filevault settings or no (and don’t forget the FileVault Master password!)
Stealth mode vs Internet sharing – users will become blocked after a short period of relative silence as the firewall sees them as new attempts at connecting to you.
Also add privoxy for privacy issues to browser use (no need for tor for most of us) the most great filtering proxy software for users.
Also check Directory Services utility – most home users would need none checked, except maybe bonjour, and a polluted dhcp server could hand control of your machine over to whomever polluted the dhcp server.
Glowworm shows promise for outgoing traffic firewall controls
Mail directly supports ssl email connections (at least it’s secured between you and whomever if they support it)
JunkMatcher used to be great for adding more junk filtering controls for Mail. Might come back.
ClamXav is early but add some applescripts, enable clamscand, and you can have an interactive opensource virus/phising/worm etc scanner to warn you that is updated up to 4 times and hr.
Please read the new follow-up. Link is, well, everywhere.
kewl stuff here …
but i still cant wait for leopard …
hehe …
If nothing else, I recommend turning on your logs so that you can SEE what sort of traffic is coming in/out. What action you take after that would be dictated by what you need/don’t need.
kewl one dude.. :)
Why didn’t you mention that Dashboard phones home?
http://www.red-sweater.com/blog/153/apple-phones-home-too
I have pressed it to the heart that people use Firewall accesories like Glowworm FW or Little Snitch, to see exactly what phones home. A complete list of things that phone home would be; Pages, iPhoto, Keynote, Microsoft Office Test Drive, and several others.
great reading!, one thing, it’s a good idea to setup the firmware password on Macbooks/Macbook Pro, if the computer is lifted it’s pretty well useless to anyone and your data will be protected.
The firmware utility can be found on your install disk or on Apples download page.
Cheers
Thanks for this. You was help me. Article who your writen was so important for me. Thanks again :) I am reading all articles in happily
thank you very good and very nice post :))))