


In an earlier post, I asked for your interest in a how-to on graphing several network statistics using MRTG, an open-source application that generates graphs using data pulled from SNMP. I used an Airport Extreme (802.11n, gigabit) for this, but it should work with Snow / Graphite Airport base stations and up (Express and Extreme). For other routers, your mileage may vary, and it may even not be possible, so I decided not to make a guide for anything else than Apple’s routers. If you want to have graphs in your desktop, updated in real time, as seen here, read on!
For this how-to, you need;
– an Apple Airport wireless base station.
– Airport Utility
– OS X 10.4 or higher (yes, Leopard is fine)
– your Mac’s installation discs if you don’t have the Developer tools installed yet.
Ready? Let’s go!
Step One: First of all, authenticate with your wireless network and open your Airport Utility. You should see something like this;

Note the name of the base station here; we will need it later. As you can see in the source list on the left, mine’s “Prokyon”. Click “Manual Setup”, and once the settings have been loaded, select “Advanced” from the toolbar.
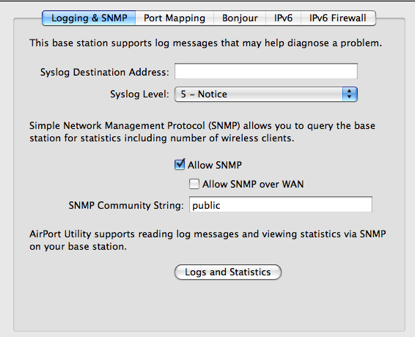
This is the selection of tabs you will find under “Advanced”. The first tab, “Logging & SNMP”, is the tab we need. Check ‘allow SNMP’ (it doesn’t have to be over WAN, as this will allow you to monitor statistics over the internet, exposing a possible security hole). That’s it for Airport Utility for now. Save the settings and quit the utility.
Step Two: Now we’re going to set up MRTG. You can get an easy-to-use binary from here; follow the basic instructions, namely;
Open a terminal,
cd (directory containing )mrtg-2.9.4-mosx.tgz
su
enter your root password
tar xzf mrtg-2.9.4-mosx.tgz
cd mrtg-2.9.4-mosx
./install.sh
exit
If all goes well, you now have ‘mrtg’ installed. Test it by typing ‘mr’ at the command line followed by pressing the ‘tab’ key. It should, given you don’t have other utilities installed beginning with ‘mr’, autocomplete to ‘mrtg’.
Step Three: Now, before we start setting up MRTG to use the SNMP services of your router, let’s test if it actually works. Open a terminal, and enter;
snmpwalk -v 2c -c public -M /usr/share/snmp/mibs:$HOME/share/mibs -m+AIRPORT-BASESTATION-3-MIB (Base station name).local 1.3.6.1.4.1.63.501
All on one line. In this case, replace ‘-c public’ with either the community string you set in the Airport Utility (‘-c thestringyouentered’) – if you left this blank in the Airport Utility, it either defaults to ‘public’ or your base station password. Try both; it will either time out or spit out a huge amount of information. Also replace ‘Base station name’ with your base station name, as I told you to note in the first step. Mine would be ‘Prokyon.local’. Done filling the blanks? Press enter, and let it roll.
If it times out, check if SNMP is enabled or restart your Airport (also remember to check if the community string you set with the -c flag is either ‘public’ or your password). If it gives an error about missing something, download the Airport MIB from Apple and copy it to “/usr/share/snmp/mibs” (you can ‘Go to folder’ with CMD+Shift+G in Finder to reach this directory), then try again.
You should get a whole lot of output in your terminal. Working? Great, let’s go to the next step.
Step Four: Along with MRTG, we installed a utility called ‘cfgmaker’, that will generate MRTG configuration files for us. In the terminal, we will have to generate such a configuration. Don’t sweat, it’s very painless.
cfgmaker public@192.168.2.5 > ~/mrtg.cfg
Ensure that ‘public’ is your community string. As described in the last step, this is most likely either your base station password (-not- the network password) or just ‘public’. 192.168.2.5 is my router’s IP address in this case; you should check what yours is, either by doing a ‘port scan’ with the Network Utility on your Mac, or by checking with your network preferences in System Preferences. It’s possibly also listed in the trusty Airport Utility. Fill in your IP address (ensure the community string and the IP address are separated by just a ‘@’) and let it do its job. The file ‘mrtg.cfg’ has been generated in your home directory.
Step Five: Now we can let MRTG do it’s first run. For sharing on the local network, I placed my MRTG web-pages and graphs in “~/Sites/MRTG/” – note that ‘~’ stands for /Users/myname/ here – as it is also very convenient. If you want to go on the safe side and do the same thing, make the directory in advance; MRTG -will not- do this for you.
Edit the newly generated mrtg.cfg with an editor like TextMate or nano (in the terminal). For the least hassle, I will describe using nano in your terminal to add the final changes to let MRTG know where to put its files.
nano ~/mrtg.cfg
Is what you need to type into your terminal. You’ll see something a bit like this;
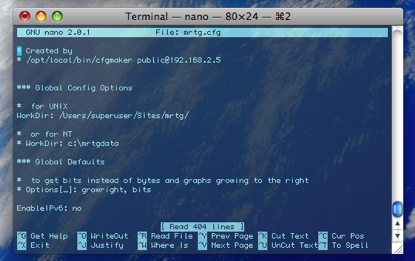
Move your cursor to the line “# FOR UNIX” and delete the single leading hash mark (#) in the line beneath it. Enter the path of where you want to store the files here, as you can see, I chose /Users/superuser/Sites/mrtg/, as my account’s short name is ‘superuser’. To save the changes, press CTRL+X, and “Y”.
Step Six: Now we will run the MRTG application. Since on Leopard, MRTG complained that I used a Unicode environment, I set the shell’s environment variable ‘LANG’ to ‘C’ before using it. The whole command to run MRTG then looks like this;
env LANG=C mrtg ~/mrtg.cfg
This is provided you followed my instructions and your .cfg file is located in ~/ (your user directory). If all goes well, MRTG should just do its thing and return your control over the prompt after a second or a few. If it outputs errors, check the steps to see if you didn’t do something a bit different. You can now check your directory (~/Sites/mrtg/ for me) to see your first graphs.
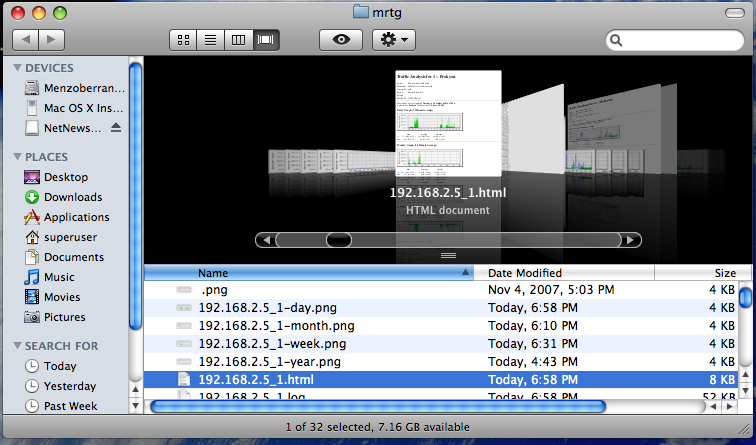
This is my MRTG output directory, and as you can see, it generated files with (your router IP address).html as a name, with a number appended to indicate the interface. Several interfaces exist on the Airport Extreme; the most interesting ones are the WAN and ATH0 interfaces, respectively your internet connection port and the wireless interface. The graphs for these, provided you run MRTG periodically, show the data throughput graphed over time. Now, since it is a bit tiresome to run MRTG all day in your terminal, we need something to do that -for- us.
Step Seven: Fortunately, there’s an excellent tool for adding such a ‘daemon’ function to our system. Running Leopard, mind that there is an extra step here, which I will let Tiger users do as well for certainty. Download ‘Lingon’, Peter Borg’s excellent GUI for launchd, OS X’s initialisation system and more. Once the download has completed, run it, and open a terminal.
In the terminal, we’re going to make a shell script with the single line of instructions that loads up MRTG. Let’s use nano for convenience again, so enter;
nano mrtg.sh
and enter the command you used to run MRTG ( env LANG=C mrtg ~/mrtg.cfg in my case), but add the complete paths this time. My command would look like this;
env LANG=C /opt/local/bin/mrtg Users/superuser/mrtg.cfg
Exit and save again with Ctrl + X. Remember to make sure the paths are accurate and the command works (test run it in your terminal to see if you get any errors). Place the shell-script somewhere out of your user directory, like /Users/Shared/, and switch to Lingon.
In Lingon, press ‘New’ and make an appropriate choice; you can use these settings as an example;
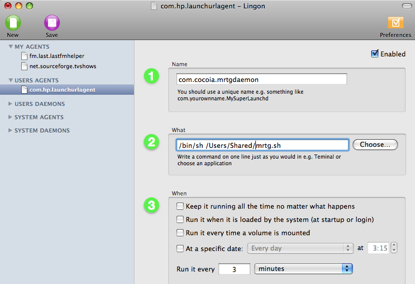
At the bottom, you can see I let it run every three minutes. You can make it run as often as you want. Save settings, and depending on your choice of Agent, reboot or log out to make the changes happen.
Congratulations! If all went well, you should have an auto-updating set of graphs now. You can choose to do two things now; check these graphs occasionally, or present them on your desktop using GeekTool like I did. Geektool’s website is down right now, so download it from last post and install it to your System Preferences by double-clicking the preference pane in the disk image.
Last Step: Once it’s installed, System Preferences opens and shows you the preference pane. Make sure you have just System Preferences shown so you can see your entire desktop (most importantly, the top left). Add an item to the left list; and set something like this;
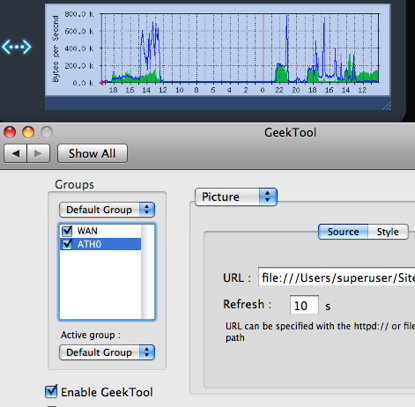
The blue rectangle is the active overlay that will contain the image you choose. You can set a refresh interval (I use 10 seconds because it’s the default), resize the image, and place it wherever you like. Although GeekTool is old (well, it hasn’t seen a lot of updates), it’s well coded in that it won’t vanish when you use Exposé or even Spaces.
My result can be seen here; if there’s demand for it, I will upload the PSD of my little ‘comm station’ overlay so you can use it with whatever wallpaper you desire. Perhaps I will write a second part with how to put this into a widget form, and tracking the amount of users on your wireless network and graphing other miscellaneous statistics. Enjoyed this how-to? Comments / blog reactions / email is welcome!
Interesting article Sebastiaan.
Now I can finally can rid of my Netbarrier.
http://www.intego.com/netbarrier/zoom.asp?screen=nbx405.jpg
Thanks
Excellent post! I’ve been wanting to monitor my inbound and outbound traffic on the Airport for some time, and this should do the trick. A couple of comments:
– The MRTG installation above has an install script that places it in /usr/local/mrtg, which will not be in your default path. I edited this before installing to use the standard “/usr/local”.
– If your Airport Name has a space, substitute a dash (“-“). For instance, if your Airport Base Station is unimaginatively named “Airport Base Station”, you’ll need to use “Airport-Base-Station.local” in the instructions above.
– For pre-N base stations, you’ll need to use your base station password, as using “public” doesn’t get any useful data, and yo can’t set the SNMP string using the Airport Utility. Unfortunately, this means you’ll have to embed your password in the mrtg.cfg file.
– I’m on Leopard and received no errors regarding Unicode, so I removed “env LANG=C”.
I did a few things differently. As I mentioned above, I used the standard /usr/local install path. I also placed the mrtg config file in /usr/local/etc, which is convenient if you’re going to run it as a daemon with no one logged in. As a result, I fire it up with /usr/local/bin/mrtg /usr/local/etc/mrtg.cfg. Finally, I placed the MRTG output in /Library/WebServer/Documents/MRTG, so it’s published on my main web site.
Now for the problem – it doesn’t seem to get getting any real data, or even all of the interfaces. The only interesting interface I have (non-loopback or mirror) is au1, which appears to be either my wireless interface. That interface isn’t showing any traffic – which is just plain wrong. So something isn’t right, probably in my cfg file. Any chance I could get a little friendly help on this?
Quick followup on my comment. AU1 is the WAN interface of the Airport; there doesn’t seem to be a way to get data on the LAN or wireless ports on the older Airport. Also, it was monitoring properly – it just took a while for there to be enough data to graph.
Thanks again for the extremely helpful post!
I cannot seem to get the installation confirmed by typing MR and tab to see if it autocompletes. When I type mrtg or cfgmaker it says command not found. when I type mr and tab, it actually autocompletes the directory “mrtg-2.9.4-mosx”. The directory mrtg-2.9.4-mosx/bin contains cfgmaker indexmaker mrtg and rateup executables. the mrtg-2.9.4-mosx is located in /Users/joe40/
Please help. Your post is great and seems like something I’d like to pursue, but I am stuck.
oops. Just got back to where I originally posted (the how to)
Now if I could only get THAT to work.
Is there a way to plot the aggregate usage for a period of time rather than data rate? Want to monitor total data usage through this WAN Comcast channel.
hello :-)
it would be nice if u can update the link to the “easy-to-use binary” of MRTG !
thanx in advance!!
Hey for me it seams like it finds a total of 15 interfaces !!
there are some that are market for deferent reasons like no data..
But i end up with 5 working interface but what is what ?
I have:
Interface 1 (gec0)
Interface 2 (ath0)
Interface 5 (wlan0)
Interface 6 (wlan1)
Interface 7 (vlan1)
and what do they exactly mean ?
and is possible to use some of the marked out for something ?
Here too. Where can one find a listing of what all the interfaces are? gec0, pflog0, lo0, vlan1, bridge0…what are all of those?
hi everyone
i hope someone could help me with this one
i want to create an mrtg.cfg file for some routers but i want only to create graphs for certain interfaces such as bridge (br0) and ethernet(eth0)
how do i do that?
i tryed somany –ifref-descr and –ifdesc-desc,name,nr arguments in this command :
cfgmaker –global “WorkDIr=…” –global “Options[_]: growright,bits” router@(i.e. 10.0.0.3) > test1.cfg
but I always get all interfaces, maybe there is a way to not show the out commented interfaces?
im looking forward to this problem, and hope someone could get me an hint
thx