


This is a folow-up on my earlier how-to “A more secure OS X before Leopard“. I have split this article from the results of the scan following the last article. I recommend following the first how-to before this one, if you haven’t read it, and see what potentially insecure defaults you can change without interfering with your daily activities. Some things touched there that I will not discuss here are;
– Filevault
– Turning on your Firewall
– Bluetooth
– Making a new, unprivileged user
Further securing OS X is something for the truly paranoid, although some of the tips in here are handy for people who do feel like a checklist of things they could do to secure their Mac further. I am one of those very paranoid people, and I like to be in control of what happens on my computer. There are, once again, basic, intermediate, and advanced tips and little tricks in here, this time clearly divided in difficulty.

– Disable your Microphone input and / or iSight if you aren’t using them This hint, from the NSA Hardening guide, is a very good way to protect against any way for an intruder to physically eavesdrop on you, and any Quicktime component can access your iSight. There might be vulnerabilities looming on the horizon. The most desirable first is the iSight, as it has a real privacy concern if it were to be compromised. It’s as simple as a copy and paste into your Terminal. It won’t be painful, just open it for now.
/usr/bin/sudo /bin/chmod a-rwx /System/Library/QuickTime/QuickTimeUSBVDCDigitizer.component/Contents/MacOS/QuickTimeUSBVDCDigitizer
I will be explaining why I use full paths to commands later on. This simple line will make sure no user level process can access the module that interacts with the iSight. To restore;
/usr/bin/sudo /bin/chmod a+r /System/Library/QuickTime/QuickTimeUSBVDCDigitizer.component/Contents/MacOS/QuickTimeUSBVDCDigitizer
(I had this all mixed up. Thanks Greg)
Many thanks to techslaves. To disable your Microphone as well, you can set it’s input volume to zero in the Sound preference pane, under the “Input” tab.
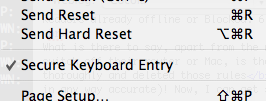
– Enable Secure Keyboard Entry in the Terminal It’s that simple. It’s in the “File” menu in the menu bar.
– Disable IPv6 if you aren’t using it. Why? Potential vector for attack. To fix this, go to the Network configuration pane. Select the connection you want to use for internet access, and click here;
![]()
And now make sure it is set as below;

– Disable automatic Movie playback. What if there were to be an iSight vulnerability by delivery in a Quicktime file? We wouldn’t want it to just play without us asking. Go to the Quicktime preference pane, browser tab;

– Set your software updater to check more frequently. Of course, we like to be ready for fixes. This goes without any picture, because this is too trivial. Just go to the preference pane of Software Update.
– Ensure that access for assistive devices is disabled. In the preference pane for Universal Access. You can also make your cursor insanely big here, which is nice.
– Use a firewall accessory application like Glowworm FW Lite, or Little Snitch . Speaks for itself. Lets you decide if you want applications to connect to something.

– Set an Open Firmware Password. OF Passwords can be subverted in some ways (the password is nulled when RAM configuration is changed), but it is a hindrance. This works differently for PowerPC Macs and Intel Macs, because the latter use EFI and the other Open Firmware. For PowerPC, use the tool in Utilities to change your password. You can also boot with Command-Option-O-F pressed, to enter the OF prompt. From there, enter your newly set password, and type;
setenv security-mode full
To set full security mode, the most secure mode.
For Intel Macs. Apple has not yet provided security extensions to the EFI. You can use the Open Firmware Password Utility to set an EFI password, but that’s about it. Perhaps in the future, we will see rEFIt become TPM-aware (see advanced section).
– Use a more reliable DNS service. It may even speed up your internet. OpenDNS is dubbed by some to be more reliable and secure than an arbitrary DNS server of your ISP. No real argument against that. To set OpenDNS’s DNS servers as yours, go to the Network preference pane, and select the interface you use for internet access.
![]()
Simply set this field, present under the TCP/IP tab in your interface of choice, to these addresses, or go to OpenDNS yourself to verify (hey, I could offer you IP’s of MY DNS server, so don’t thread lightly).
– Set a login-window warning banner. (Courtesy of the Corsaire Report) Simply type;
/usr/bin/sudo /usr/bin/open /Library/Preferences/com.apple.loginwindow.plist
in the terminal. This opens the preference file of your loginwindow application.
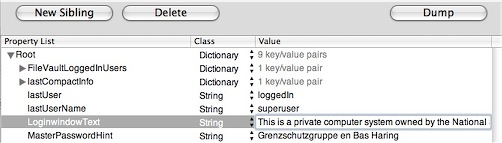
Make sure where the suggestion for the password is, like my bogus text here, completely empty. Mine says “Grensschutzgruppe en Bas Haring”. Password hints may be a risk to the security of your system. Now, back on topic. Simply click the New Sibling button, and add the sibling LoginwindowText. Add some intimidating text, like;
This is a private computer system and is for authorised use only.
Any or all use of this system and all files on this system may be intercepted and monitored.
Unauthorised or improper use of this system may result in disciplinary and/or legal action. By
continuing to use this system you indicate your awareness of and consent to these terms and conditions
of use.
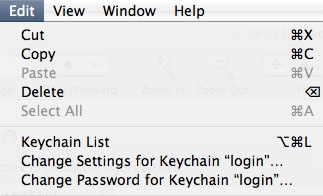
– Lock your keychain. By default, the keychain that stores your passwords, is always unlocked. No one can read your passwords, but programs are able to access your passwords, if they created the password. Use the Keychain Access application to set another password than your login password for the keychain. It will then prompt you for your keychain password every time an item is needed, and it will be open for a configurable period, which defaults to 5 minutes.
– Use Encrypted Disk Images. To secure file, or nest encrypted files even deeper in filevault, you can use the Disk Utility to create secure disk images.
– Set a more critical umask. (command courtesy of Corsaire write-up) The default umask allows all users to read each other’s new files. This command disables this;
/usr/bin/sudo /usr/bin/defaults write /Library/Preferences/.GlobalPreferences NSUmask 23
– Enable Process Auditing. (command courtesy of Corsaire write-up) This will log commands executed by all users. One line;
/usr/bin/sudo /bin/mkdir /var/account && /usr/bin/sudo /usr/bin/touch /var/account/acct && /usr/bin/sudo /usr/sbin/accton /var/account/acct
It will now run from startup.
– Force SSH to use SSH2. You can edit the ssh configuration like this;
/usr/bin/sudo /usr/bin/nano /etc/sshd_config
Now replace the line that reads “#Protocol 2, 1” with “Protocol 2”. Lose the comment mark, otherwise it won’t work.
– Use full paths to command names. This security measure, coined mostly by Rixstep (the author of the brilliant ACP), ensures Bash or defaults path poisoning is no longer an attack avenue. Although the bash developers didn’t consider it to be a real issue, Rixstep’s CLIX (an essential accessory to any power user, and it is free) has path resolving and builtin measures against path poisoning.
– Keep an eye on startup scripts in launchd. Lingon can be used to monitor what starts up automatically. It’s an excellent GUI utility.
– Keep an eye on running services. I use the simple iServeBox for this. A simple GUI to enable or disable services, handy if you know what you are doing.

– Compile and run Bastille-OSX on a regular basis.Bastille for OS X is a hardening assessment tool. It goes recommended for anyone that knows what he or she is doing. Perl-Tk on OS X might be a useful resource in this effort.
– Compile and implement SEDarwin. PPC-only for now, SEDarwin is an adaptation of the open Darwin kernel at the heart of OS X to support the Mandatory Access Control framework. It is, of course, based off SELinux.
– Use the Trusted Platform Module in your Mac. This is, only if it has one. The first generation of Macbook Pro’s have a TPM, for example. Do an ioreg;
/usr/sbin/ioreg | /usr/bin/grep -i tpm
The output should look like this, and not any differently;
| +-o TPM
In this case, you got a TPM and after you have installed the new, very cool open-source drivers and utilities by Amit Singh, you can go use it with services you'd expect from it. As an advanced user, you could compile several tripwire-like solutions to hash files on disk and run them against a database of hashes stored in your TPM without having processor load, or bake your own solutions.
This concludes my divided how-to on securing your Mac beyond its defaults. You can use the following resources to your advantage, like I did, and try to persuade people to watch security more on OS X. And no, I promise, there will be no more scanning. Be safe out there.
PDF Guides:
NSA's Guide to Panther Hardening
Corsaire's Guide on Securing OS X Tiger
Apple's Document on Securing Tiger
small edit; added instructions for Intel Mac OF password, consistently explained using the full path to programs, added TPM entry.
Thanks for reminding me about Open DNS. I saw it announced a while ago, and wanted to wait and see if it held up.
Actually, this should be higher up on the list. Once I saw your comment, I realized how often I was using public wireless routers. Who knows what they use for DNS and whether they add man-in-the-middle attacks?
People really should define a secure DNS service.
Geoff, I think you make an excellent point. I have recommended / installed it on many a friend’s machine, and I suggest any reader to do the same.
Thank you very much for the security article. I’ve been going over Beale’s Bastille slides and find myself wishing that there was a Cocoa implementation. Or do we have to wait till disaster hits (which is usually the way of human-kind)?
This is very hot info. I think I’ll share it on Twitter.