


In this new quick and dirty how-to, I want to address how I secure my personal network, consisting of a few rogue Windows computers (I manage a network that connects two houses with one internet connection at home) and two Macs, a FreeBSD server and a Linux server (my computers). It’s got wired and wireless access points, and my servers use wired connections. I use several tools on all platforms that you can all test for yourself without even touching your computer with the latest 2.0 of the Backtrack live CD, a GNU / Linux security distribution that features some hot tools for you to use out of the box. Make sure it supports your hardware, though, or you will be in for a very boring ride.
First off, wireless networking is a very big hole in the security of any network. It’s trivial to penetrate many networks, in spite of encryption, MAC filtering (filtering devices by their hardware address) and other security mechanisms, it adds an attack vector for anyone with malicious intent. For rather personal reasons (I don’t like people whining about internet being a hassle) and fun and profit (more about this later on) I chose to keep my wireless access point.
What’s always important to know, is who or what is on your network. The primary tool I use to enumerate hosts on my networks is Nmap, by the brilliant Fyodor. In any environment that’s got a shell (even Windows has a shell, check out Cygwin), Nmap is trivial to automate, and it’s output is trivial to process. It runs nice and fast, and it has a host of options. Check out this shell command as an example to find hosts on your network and get the output in a format that is readable and even printable by dope things like Geektool (OS X), to put the output on your desktop.
'/opt/local/bin/nmap' -sP 192.168.2.0/24 | awk '/192.168./ {print $2, $6}'
Note; /opt/local/bin/ is my path to nmap. Use your own. The -sP command does a ping sweep of all hosts in the 192.168.2. subnet. In other words, the netmask is 255.255.255.0, or /24. You should change this to your network’s IP address range, as well as the two fields in awk. The output of the command looks like this;
192.168.2.1 up.

192.168.2.2 up.

192.168.2.4 up.
Now, that’s just handy. Now we can already know what ping-replying people are on the network. If there seems to be a bit of a delay, and our scan doesn’t return results, we can use the more advanced options of Nmap – which require privileges. Some options to consider; -sL; the list scan. Will mass-scan a list of hosts, which you can use with the following, useful flags; -v for verbose mode, extra output! You can use the -PR, -P0 or -PN options to respectively use ARP for pinging, not ping at all, or use ICMP netmask requests (a clever one which can bypass Windows and OS X ‘stealth’ mode firewalls default ICMP rules). With the -O flag, you can also let Nmap try to fingerprint the hosts’ OS, which can be handy, as well as giving a guess of the network device’s hardware vendor with the aforementioned verbose mode. There are many open-source programs to quickly or otherwise uniquely enumerate or find hosts on a network, and I leave it to the reader to vary with programs like hping3, arping, fping, scanrand and others to get different or better results. I use arping and scanrand (Dan, the man!) on a regular basis, because each has it’s own advantages.
A commonly-used attack on networks once in is using a poisoning attack to capture traffic. Virtually all routers operate as switches today, which means they don’t just send out all traffic on the network to anyone, but switch it between appropriate hosts. To keep track of all the hardware addresses and routing between platforms in the traditional IPv4, the ARP protocol is used. My very, very favorite tool for fucking with ARP (excuse my language) is ettercap, but most people, for the safety of their own network, will merely want to keep tabs to see if people aren’t doing nasty shit. For this purpose, arpscan is a very fine choice. It compiles cleanly on virutally all operating systems (I don’t know about Windows, but this is owning your network open-source style, not borked-lego-interface style) and it sends an email to your local account when some suspicious activity occurs. Suspicious could be someone new seen on the network, or someone doing real nasty stuff (MAC spoofing / ARP poisoning). You can always manage these messages with the most owning open-source Mail program, pine, or simply use the command-line tool mail.
Offensive network defense is sometimes a good idea if someone won’t leave the network when asked politely. Make sure you know what you are doing, and use Backtrack, or any UNIX with ettercap to use the dark side of… ARP (and a host of other attacks!).
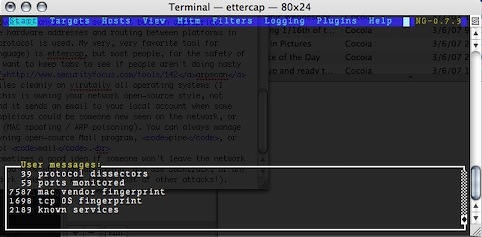
Say hello to ettercap -C. Ettercap obviously requires privileges, and it can be used to sniff out traffic first, but also make a nice host list and perform attacks on these hosts. The -C option uses by favorite interface system, Curses, but if your X11 has GTK, you can download ettercap-gtk and run it in it’s own window, with a ‘real’ interface. It can, obviously, also be ran as a command-line tool.
If you do not know what you are doing, fooling around with ARP Poisoning could break a network. Yes, you can get in dire trouble if you really start to fuck around with this in places other than your own network. Now, if you don’t mind your router being harassed by routing the traffic, you can disable internet for a host by simply not changing your routing settings, and performing ARP poisoning with ettercap. The hosts’ traffic will be routed through the router, to your computer, which will drop it. Incidentally, this often means the host sends it’s IM login info several times, which ettercap will display for you.
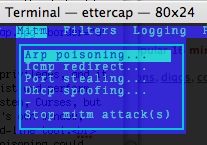
Use this attack, with the ‘remote’ option. Don’t forget to use the ‘Stop mitm attack(s)’ when you are done. The console should provide you with output like the dropped packets and passwords. Configure logging to a convenient file in the logging tab, and make sure you have your router configured as Target 1, and the victim as Target 2 in the host list (under Hosts, obviously). Dandy. You can mess around with other, potentially destructive options on your own network at your own discretion. Just remember, I didn’t break it.
Now, what else can we do to own a network? Well, the former Ethereal (now Wireshark) is an excellent cross-platform (Nmap-cross platform, Windows users, go wild) packet sniffer. You can use it to take a more in-depth look at your traffic, as it can often sniff out raw wireless packets too, and login information. The convenient protocol coloring shows you what part of the network traffic is what, even measured in percentages. Think that sounds nice? Here’s an obligatory screenshot.
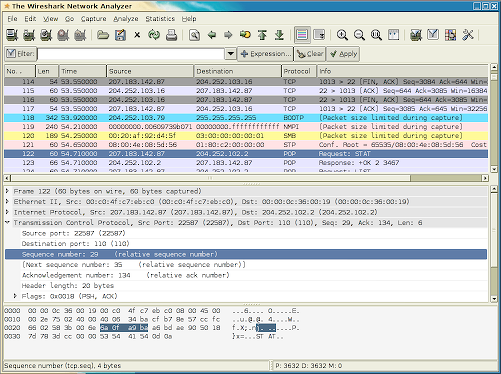
Ooh, pretty colors. Remember you can always check all these tools out hassle-free if you have a Backtrack-compatible setup.
This should give you some pointers on what steps you can take to feel like you are owning your network a bit more. Remember to look at the tools, read the documentation and be creative. The only way to control a network is to get in touch with the technical side.
3 Responses
[…] Original post by Cocoia Blog and software by Elliott Share and Enjoy: These icons link to social bookmarking sites where readers can share and discover new web pages. […]
[…] In this new quick and dirty how-to, I want to address how I secure my personal network, consisting of a few rogue Windows computers (I manage a network that connects two houses with one internet connection at home) and two Macs, a FreeBSD server and a Linux server (my computers). […]
205631 Blog Verification…
205631…
Trackbacks